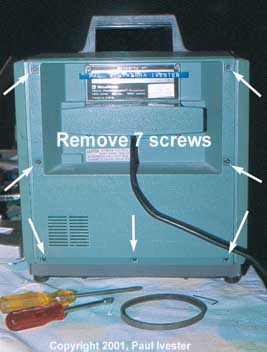
Remove the 7 screws from the outside edges of the back.
The Problem:
One of the most common repairs required of Bell and Howell projectors of the 1500 and 2500 series is the drive belt getting loose. Sometimes it is obvious that the projector is running slow at all speeds, More often it is just a slowing down at the end of a long reel, causing the sound to wobble. It can also cause balky rewinding, though these projectors were never very good at rewinding. Replacing the belt is a repair that is quite easily accomplished. Once you have the parts and tools together it takes about 30 minutes.
Obtaining replacement belts:
The main supplier of these used to be KMR electronics. They have gone out of business.
I heard that their inventory had been transferred to International Cinema Equipment in Florida, www.iceco.com
If you need only one, and/or are ordering other supplies, Larry Urbanski is a good source. His charges for international shipping is usually reasonable.
http://members.tripod.com/~Moviecraft/index-6.html
Urbanski Film
P.O. Box 438
Orland Park, IL 60462
708-460-9082
FAX: 708-460-9099
My technique is not the only possible method. Larry Urbanski says
that
he finds it to be faster to cut the wires to the motor, remove the
motor
mount screws, and slip the belt over the motor, splicing the wires when
done. This saves removing the end panel.
| Believe It... Or Don't!
Tom Hudgins, a highly respected film collector and dealer, reports that he has had success with cutting the belt and gluing it together. The only adhesive that he found that works is Bondini No. 2. In a pinch, he has been able to fix a loose belt by removing a short length, and gluing it back together. He has been running a projector this way for a long time, and the belt hasn't broken yet! |
Replacing the belt on a Bell and Howell 1500 - 2500 series 16mm Projector.
I am referring to the plastic case models here, the metal case ones are slightly different.
Tools:
Phillips #2 screwdriver.
1/4 inch nutdriver with small outside diameter.
1/16 inch Allen wrench.
On the metal case models, a 3/16 inch nutdriver is needed to remove the
case.
On some models, the setscrews aren't standard Allen, but are rather
what is known as a spline Bristol head. Inexpensive sets of these
are available from Max Gain Systems: http://www.mgs4u.com/Bristol-spline-L-keys.htm
(I have no affiliation with them, they are just one of the few places
that has theses hard-to-find wrenches).
| Warning! Be sure to unplug the power cord before opening the case, there are dangerous moving parts and exposed electrical terminals inside. |
---

Remove the 7 screws from the outside edges of the back.
Remove the back, slide it down the cord.
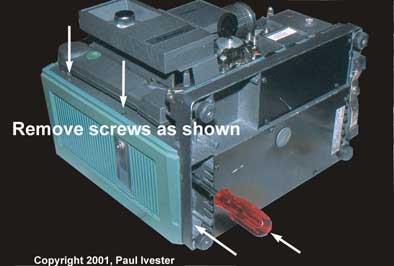
Remove the 2 screws from the front plate that holds the end on.
Remove the 2 screws from the bottom the hold the end on.
On the plastic case models it is convenient to remove the speaker
jack
to make it easier to move the end out of the way.
On Metal case models, it may help to unplug the amplifier. Be very careful when doing this.
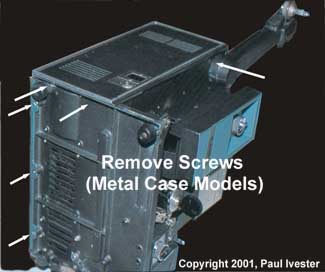
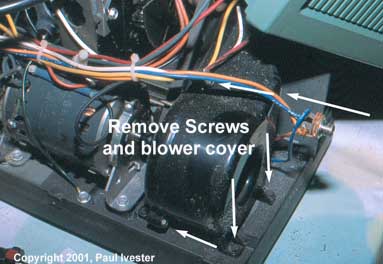
Remove the 3 screws that hold the halves of the fan cover together.
Remove the 2 screws that hold the fan cover to the base.
Remove the fan cover.
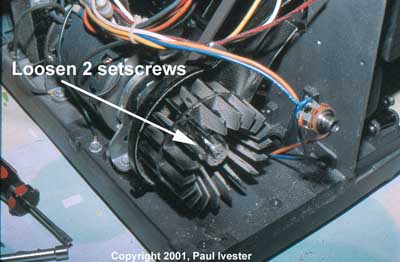
Loosen the 2 set screws that hold on the fan impeller. Note where the impeller sits on the shaft.
Remove the impeller.
Work the belt loose from the upper pulley.
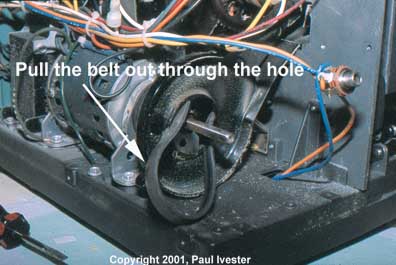
Pull the belt out through the hole in the fan cover.
Put the new belt in the way the old one came out. Work it around the
upper pulley.
Put the fan impeller back on and tighten both set screws.
Put the fan cover back on and tighten all 5 screws.
Put the speaker jack back on the plastic case model.
On an early metal case model, this might be a good time to replace the .206 speaker jack with a standard 1/4 inch type.
While the cover is off, this is a good time to lubricate the
mechanism. Use only white lithium grease on the plastic gears.
Replace the end cover and tighten all 4 screws.
Replace the back cover and tighten all 7 screws.
Copyright 2001, 2003, 2005, 2011 Paul Ivester